반응형
Ubuntu 24.04에서는 서버나 데스크탑 배포 시, 수작업을 최소화하고, 반복적인 설치 작업을 자동화할 수 있는 Autoinstall 기능을 제공합니다. 이 글에서는 autoinstall.yml 파일을 활용하여 Ubuntu 24.04를 자동 설치하는 방법을 소개하겠습니다.
Autoinstall ?
Ubuntu의 Autoinstall는 Ubuntu 서버나 클라우드 이미지를 설정할 때 사용하는 무인 설치(자동 설치) 방법입니다. 사용자가 정의한 설정 파일(autoinstall.yml)에 따라 설치 과정이 자동으로 이루어집니다. 이 방법을 사용하면 여러 대의 시스템을 손쉽게 동일한 설정으로 설치할 수 있습니다.
Autoinstall 파일 (autoinstall.yml) 준비
# autoinstall.yml example based on the preseed content

version: 1

# Locale and keyboard configuration
locale: ko_KR.UTF-8
keyboard:
  layout: kr
  variant: kr104

# Timezone configuration
timezone: Asia/Seoul

# Identity configuration
identity:
  hostname: ubuntu
  username: user
  password: # "openssl passwd -6 비밀번호" 명령으로 비밀번호 생성해서 입력

# Storage layout
storage:
  layout:
    name: direct  # Use direct layout, change this if needed

# Packages to be installed
packages:
  - htop
  - openssh-server
  - gparted

# Updates and upgrades
updates:
  policy: unattended-upgrades

# SSH configuration
ssh:
  install-server: true
  allow-pw: true

# Early command to unmount
early-commands:
  - umount -l -r -f /isodevice

# User-data or any additional scripts can be added here
웹서버로 파일 접근 가능하게 설정
이제 설정한 파일을 사용중인 홈 경로에 저장하고, 터미널을 이용해서 파일이 있는 경로로 이동 후 다음과 같이 8000 번 포트로 파일을 가져갈 수 있게 준비합니다.
cd ~/
python3 -m http.server 8000

sudo ufw allow 8000/tcp
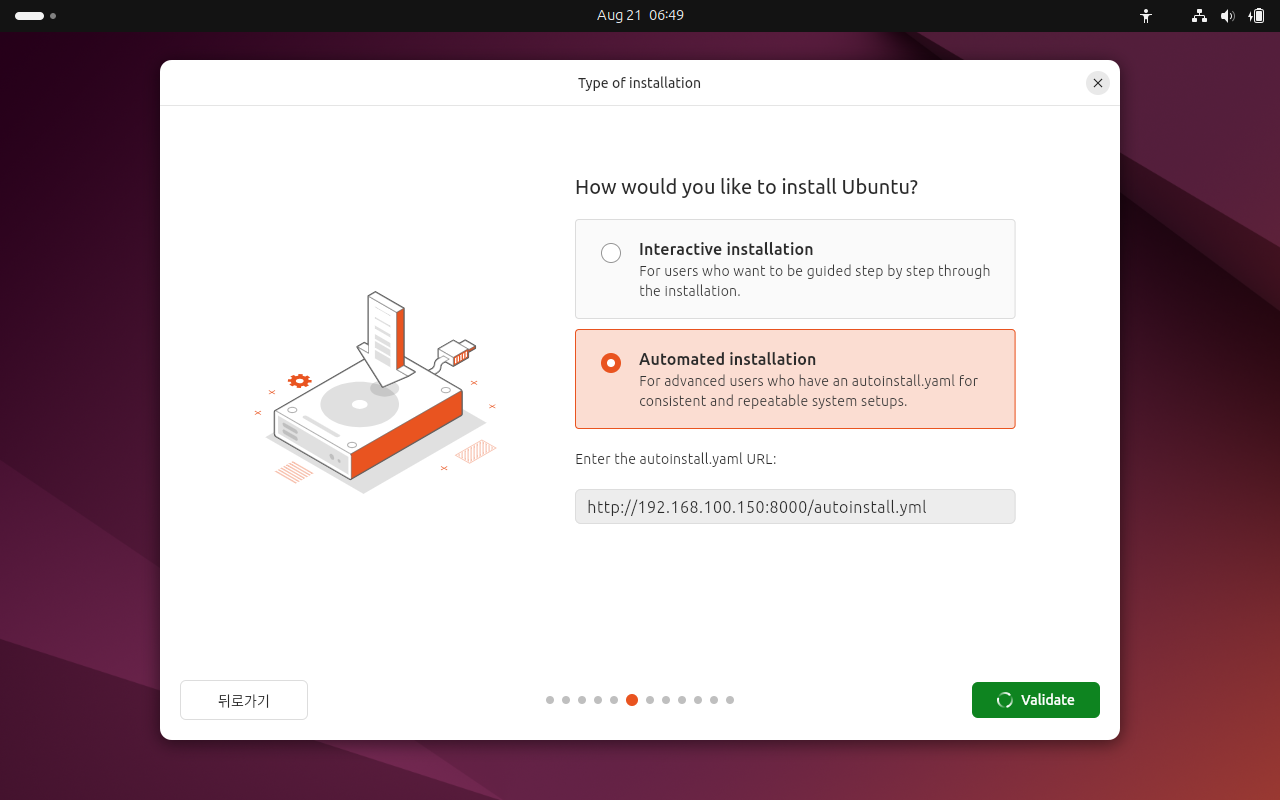
이제 이 파일은 http://자신의 IP:8000/autoinstall.yml 주소로 가져갈 수 있습니다.
Ubuntu 설치
설치를 진행하고 아래 화면에서 다음과 같이 자동설치를 선택후 http://자신의 IP:8000/autoinstall.yml 를 입력합니다.

이 방법을 사용하면 autoinstall.yml 파일을 로컬 네트워크에서 웹 서버로 제공하여 Ubuntu 24.04를 자동으로 설치할 수 있습니다. 이 방식은 여러 대의 서버를 효율적으로 관리하고 설치하는 데 매우 유용하며, Python의 간단한 웹 서버 기능을 활용하므로 설정이 매우 쉽습니다.
반응형
'오픈소스SW' 카테고리의 다른 글
| 2024년 오픈소스 현황 보고서 (2) | 2024.08.28 |
|---|---|
| 리눅스 커널 패키지는 어떤 용도일까요? (0) | 2024.08.21 |
| 오픈소스 세계의 짠한 현실 (0) | 2023.12.19 |
| 오픈소스SW 연구개발 역량성숙도 모델 (0) | 2023.04.27 |
| 개방형 OS 생태계에 대한 이해 (0) | 2020.12.09 |